By Susan Jones
The saying “If some is good, more is better” is not necessarily a beneficial approach to fertilizing orchids. Plants will only absorb the amount of mineral nutrients they need, which is determined in part by the amount of light they receive, the temperatures they are grown in and the quantity of water available. Just as with people, too much food can cause serious health problems in orchids — excess mineral salts can build up, which they cannot tolerate. It is a gradual problem, affecting orchids that have been consistently overfertilized or have gone too long without repotting, allowing mineral salts to accumulate and concentrate over time.
Fertilizing
If you grow a mixed collection, one in which a variety of genera are represented, the fertilizing needs of your plants may vary considerably. The general rule of thumb — applying a balanced fertilizer weekly, weakly — is a good starting point.
Too much or too strong fertilizer can burn orchid leaves and roots.
Many growers recommend that plants be watered with plain water, then watered a second time with a fertilizer solution. This ensures that the medium is thoroughly wet before fertilizer is applied. Some mixes, especially those containing pine bark, can be difficult to wet through, and so should be prewatered with plain water and left to sit a few minutes until the medium is completely damp. This helps reduce salt buildup and the possibility of root burn.
Most vandaceous orchids do best with copious amounts of fertilizer, and during growth may benefit from dilute applications of fertilizer as often as twice a week. Pleurothallids, on the other hand, do not require nearly the same quantity of nutrients, and may be better off with a biweekly schedule. In addition, any orchid will require more nutrients during periods of active growth, less during periods of slower grow and possibly none during dormancy.
Fertilizer can be applied weekly to biweekly at half or even a quarter of the strength recommended by its manufacturer. When in doubt, start with a more dilute solution and observe the results on your plants. Should the beginning quantity prove insufficient, the amount of fertilizer may be adjusted upward with fewer repercussions than burning the plant through over-fertilization.
There are many high-quality fertilizers available, but be sure the one you choose for your orchids is labeled specifically for their use, rather than an all-purpose garden or houseplant fertilizer. It should also include a balance of the three main elements: nitrogen (N), phosphorus (P) and potassium (K) (the percentage of each element usually appears on the label in numeric form, such as “7-7-7”; the remaining percentage is composed of inert ingredients), and ideally micronutrients as well.
Water quality
Water quality is important, and contributes to the overall health of plants. Rainwater, melted snow, deionized water or reverse-osmosis (RO) water with a bit of tap water added are all low in dissolved mineral salts and considered safe for watering orchids. Chlorine damages orchids, but chlorinated tap water may still be used. Fill a container with the water for the plants and allow it to sit open overnight before watering. This allows the chlorine to dissipate. Well water and softened water are more tricky. Well water may have a high mineral content and softened water has sodium added, both of which can damage orchid roots. They may be treated with a reverse-osmosis system to filter out harmful salts.
Salt buildup
Starting with water of excellent quality is important, but salts from added fertilizers may still accumulate over a period of time. Salt buildup looks like whitish to brownish crusts on the medium and around the pot, or on the surface of the mounting substrate on mounted orchids, and can be a sign of over-fertilizing. If allowed to remain, those salts will negatively impact the health of your plant. Fertilizer salts burn and kill orchids, especially in more sensitive genera like paphiopedilums, phragmipediums, pleurothallids and bulbophyllums.
Fertilizer burn symptoms
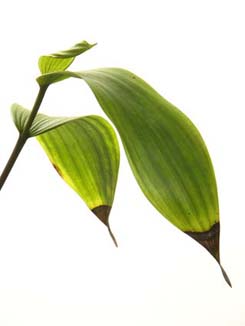
Lack of root growth may indicate an unhealthy concentration of mineral salts in the medium, on up to full fertilizer burn. If this is suspected, decant the plant and check its roots. Dead root tips, brown roots or salt crust on the potting medium surface are signs of trouble. In later stages, brown leaf tips may appear, indicating burned roots. Leaves, and eventually pseudobulbs on sympodial orchids, can become yellow. If allowed to continue, fertilizer burn will eventually kill the plant.
Soft-leaved orchids are especially susceptible to leaf burn.
Prevention
When beginning a fertilization regime, it is safer to err on the side of a weaker solution for several months until it is determined how much fertilizer the plant needs and can use. Starting out slowly reduces the risk of damaging tender young roots, especially on seedlings or more sensitive plants, with too strong a concentration of fertilizer.
Larger applications of fertilizer can increase plant growth in heavy feeders such as vandas, but when this is done plenty of water should be available to the plant at all times. The concentration of fertilizer salts increases as the amount of water decreases, which can damage the roots if they are allowed to dry too much.
Plants that require a dry winter rest period should not be fertilized for a few weeks before that rest period is initiated. Otherwise, roots may burn when fertilizer salts remaining in the pot and mix concentrate as water is cut back.
Dry or sunburned plants are most susceptible to fertilizer burn. Fertilizer salts are hard on dehydrated plants, as they are not able to absorb fertilizers properly. Use a dilute solution (one quarter of the recommended strength), water well between feedings, and check regularly for salt buildup on your pots and potting medium as your plant recovers.
Flushing media and root zones with plain, fresh water at least once a month will dissolve and remove mineral salts that can otherwise build up in the pot and media and harm plants. Mounted plants need regular leeching as well, and should have their mounts and roots flushed regularly. Some growers incorporate this into their care regime, fertilizing orchids at every other watering so that the media is automatically flushed clean in between.
Treatment
If the damage is done and an orchid injured through overfertilizing, the road to recovery starts with decanting the orchid, removing all of the old medium and thoroughly flushing the roots with plain water to remove accumulated salts. Next, repot the orchid using fresh clean medium and a new pot. Keep the plant shaded and shield it from temperature extremes as you would any recently repotted plant, watering regularly and reintroducing a dilute fertilizer once the plant begins to establish.
—
References
- Dodge, Vivian M. 2001. “Tips for August.” Vivi’s Orchid Corner. 5(7).
- Fortner, Linda. 2001.“Fertilizing.” Linda’s Orchid Page.
- Light, Marilyn H.S. 1999. “Orchids – Wondering Why #3.” ICanGarden.com.
- Orchid Tips. 2000. “Orchid Care Made Easy.” OrchidTips.com
- Phil’s Orchid World. 1998. “Fertilisers.”
- van Rooyen, Angela. “Growing Orchids.” Cape Orchid Society.
Susan Jones was the editor of Awards Quarterly and assistant editor of Orchids. American Orchid Society, 16700 AOS Lane, Delray Beach, Florida 33446
Reprinted with permission from the SEPTEMBER 2003 issue of Orchids — The Bulletin of the American Orchid Society. Copyright American Orchid Society — aos.org


